

Are your windows outdated, drafty, or simply in need of a fresh new look? Installing replacement vinyl windows can be a game-changer for your home’s appearance and energy efficiency. But with so many options and techniques available, how do you know where to start?
Well, fear not! In this comprehensive guide, we’ll walk you through the step-by-step process of installing replacement vinyl windows. From choosing the right type of replacement window to measuring accurately and ensuring a proper installation, we’ve got you covered.
So, whether you’re a DIY enthusiast or considering window replacement services, get ready to transform your home and discover everything you need to know to make this project a success.
Key Takeaways:
- Choose between full-frame and insert or pocket replacement windows depending on the condition of your existing window frames.
- Accurate measurements are crucial for ordering the right-sized replacement windows.
- Properly removing the old window ensures a stable frame for the new installation.
- Flashing tape, shims, and silicone caulk play vital roles in achieving a secure and watertight fit for your new window.
- Replacing your windows can enhance your home’s appearance and save you money on energy bills.
How to Measure for Replacement Windows
Measuring for replacement windows is an essential step in the installation process. It ensures that you order windows that fit perfectly into the existing frame, avoiding any gaps or improper installation. To measure for replacement windows, follow these simple steps:
- Step 1: Start by gathering your measuring tools, including a tape measure and a notepad to record your measurements. Having a pencil or pen handy is also helpful.
- Step 2: Measure the height of the pocket opening. Start by measuring the height at the left side of the window, followed by the middle, and then the right side. Note down the smallest measurement.
- Step 3: Next, measure the width of the pocket opening. Measure the width at the top, middle, and bottom of the window, and again, record the smallest measurement.
- Step 4: Repeat the measurement process for each window you plan to replace.
Remember, it’s important to measure the height and width inside the existing frame and not between the stops that hold the sashes in place. Using the smallest height and width measurements when ordering your replacement windows ensures a proper fit.
Now that you’ve taken precise measurements for your replacement windows, it’s time to move on to the next step: removing the old windows!
Expert Tip:
If you’re unsure about your measuring skills or want to ensure accurate measurements, consider consulting a professional window replacement service. They have the expertise to take precise measurements and help you choose the right windows for your home.
How to Remove the Old Window
Removing old windows is a crucial step in the window replacement process. It is important to remove the existing windows properly to ensure a smooth installation of the new ones. While the exact steps may vary depending on the window design, we recommend removing the windows from the outside for this project. Follow these steps to remove the old window:
- Start by removing any storm windows, if applicable. This will expose the main window for removal.
- Using a utility knife, score along the edge of the storm window frame to remove it.
- If your old window has sashes with sash weights or sash springs, remove them next. This step will make the window easier to handle.
- Identify and remove any stops on the existing window. Stops can include interior stops, parting stops, and exterior stops. These stops hold the window in place and need to be removed to take out the window.
- Fill any holes left by the removed stops with wood filler. This will ensure a smooth and stable frame for the new window.
Pro Tip: Before proceeding with the installation of the new window, make sure the frame is stable and all necessary repairs are done. Taking the time to prepare the frame properly will result in a better installation.

Now that you have successfully removed the old window, you are ready to proceed with installing the new one. Section 4 will guide you through the window installation process.
How to Install the New Window
Installing the new window is the final and most exciting step in the window replacement process. After all the preparation, it’s time to see your new windows take their rightful place in your home. Let’s dive into the window installation process and bring your vision to life.
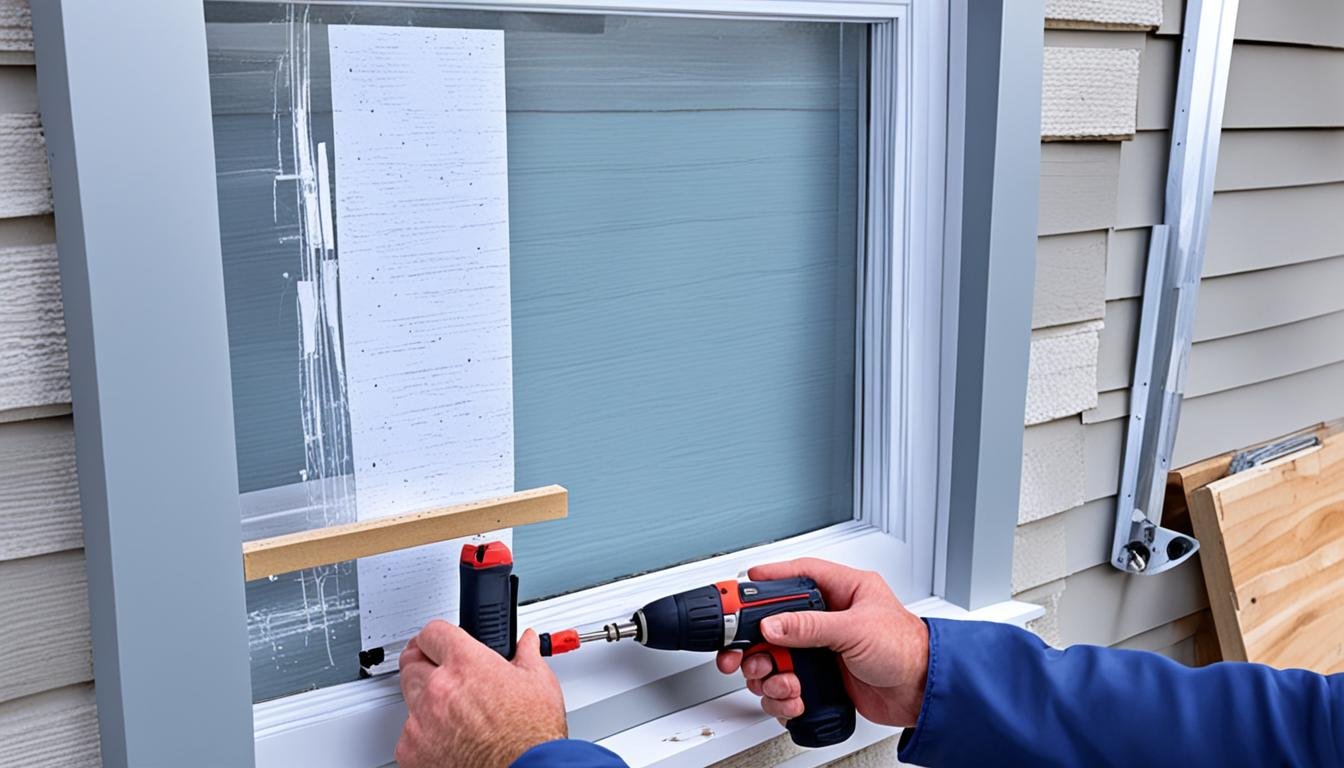
Step 1: Prepare the Window Opening
Before installing the new window, it’s crucial to ensure the window opening is clean and ready. Remove any debris or old caulk from the opening, and apply flashing tape to the sill to provide an additional barrier against water infiltration. Make sure the sill is level and use shims to make any necessary adjustments to achieve a perfect fit.
Step 2: Dry-Fit the Window
Before applying any sealant or securing the window in place, it’s a good idea to dry-fit the new window into the opening. This allows you to ensure that it fits properly and makes any necessary adjustments before proceeding with the installation. Take the time to double-check the measurements and ensure that the window sits snugly in the opening.
Step 3: Apply Caulk and Install the Window
Once you are satisfied with the dry-fit, it’s time to apply your bead of silicone caulk. Start by applying caulk at the interior head, stops, and sill. This ensures a tight and secure seal to prevent any air or water leaks. Carefully place the window in the opening, resting it against the interior stops and pressing it firmly against the caulk.
Now, it’s time to secure the window in place using screws and shims. Begin by placing shims at strategic points around the window frame to make sure it sits evenly and is properly aligned. Then, drive screws through the frame and shims into the window opening, ensuring that the window is securely fastened.
Step 4: Insulate and Finish
After the window is securely in place, it’s essential to insulate any gaps around the frame to improve energy efficiency and prevent drafts. Use an insulation material, such as expanding foam, to fill any noticeable gaps between the window and the opening. Be careful not to overfill and cause damage to the window or frame.
Finally, it’s time to add the finishing touches. Install any necessary accessories, such as a sill adapter or exterior trim, according to the manufacturer’s instructions. The exterior trim enhances the aesthetics of the window and provides added protection from the elements. Once everything is in place, apply a bead of latex caulk along the interior trim for a clean and polished look.

| Step | Action |
|---|---|
| 1 | Prepare the window opening by cleaning, applying flashing tape, and leveling the sill. |
| 2 | Dry-fit the new window to ensure a proper fit. |
| 3 | Apply a bead of silicone caulk and install the window, securing it with screws and shims. |
| 4 | Fill gaps with insulation material and install necessary accessories. |
| 5 | Apply latex caulk along the interior trim to complete the installation. |
Congratulations! You have successfully completed the window installation process. Your new windows are now ready to provide enhanced energy efficiency, improved aesthetics, and increased comfort in your home. Sit back, relax, and enjoy the beauty and functionality of your newly installed replacement windows.
Conclusion
So, you’ve reached the end of our guide on installing replacement vinyl windows. It’s clear that choosing the right type of replacement window, measuring accurately, removing the old window properly, and installing the new window correctly are all crucial steps in this process. Whether you’re a confident DIY enthusiast or prefer to hire a professional, the end result will be worth it.
By replacing your windows with new, energy-efficient options, you can not only enhance the appearance of your home but also improve its energy efficiency. This means potential cost savings on your utility bills and a more comfortable living environment.
Remember, taking the time to follow the necessary steps and ensuring a proper installation will ensure that you can enjoy the benefits of your new windows for years to come. So go ahead and embark on this project with confidence, knowing that you have the knowledge and skills to make it a success.
FAQ
What is the difference between full-frame and insert or pocket replacement windows?
How do I measure for replacement windows?
What is the proper way to remove the old window?
How do I install the new window?
Why is it important to properly install replacement windows?
Source Links
- https://www.architecturaldigest.com/reviews/windows/vinyl-window-installation
- https://www.familyhandyman.com/project/how-to-install-vinyl-replacement-windows/
- https://www.lowes.com/n/how-to/install-a-replacement-window